
This scenario is part of a larger campaign, but could certainly be used as a one off adventure or folded into an existing story. It was concepted and designed for D&D 5e, but could easily be modified for other game systems.
The Crypt entrance is built upon a small bluff that overlooks the ocean. The entrance is what looks like a demon’s head with a gaping mouth and blunted fangs. It is constructed from limestone, but looks unnaturally weathered. The sparse trees surrounding the entrance are dead and gnarled. They haven’t always been this way, they appear to have only died just this past summer. The slightest hint of some foul odor seems to be wafting out of the Crypt entrance, as soon as you notice the stench it seems to immediately dissipate.
The night becomes eerily quiet as clouds begin to occlude the moon. The faint sound of shuffling can be heard echoing from the depths of the crypt… Or was that just your imagination? Straining to listen, the sound of your own blood rushing in your ears begins to overwhelm all other sounds and you lose your focus. There is nothing more to do but venture into the Crypt and investigate the odd reports of disturbances coming from deep within.
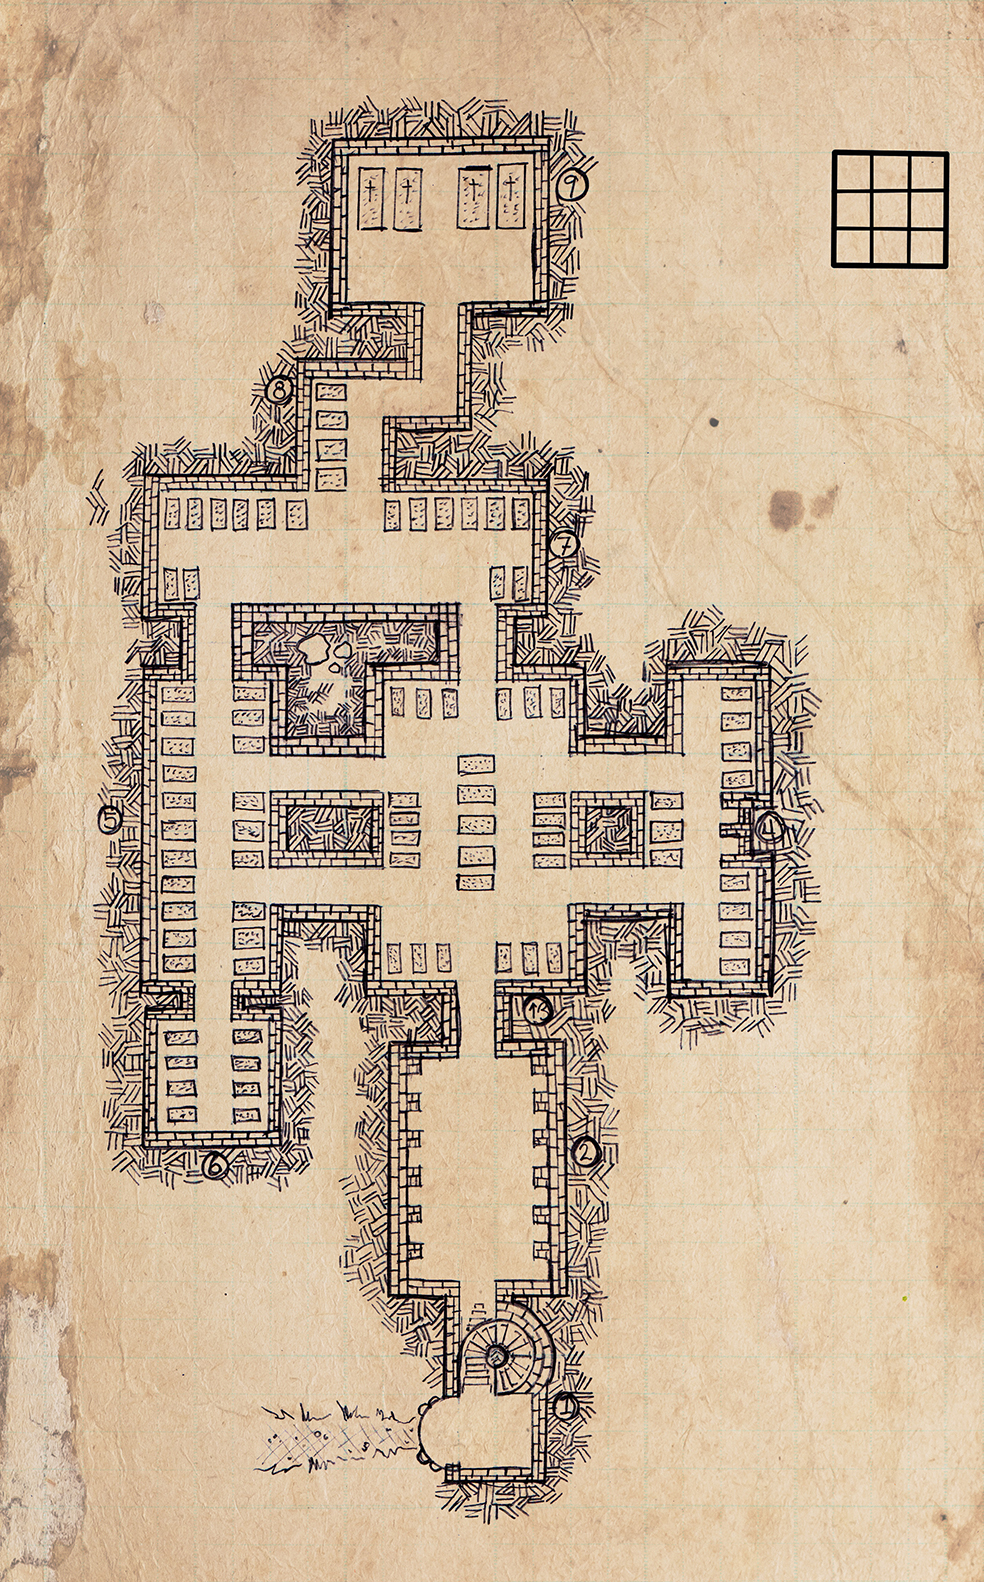
Area 1 (Entrance):
The front entrance is a 15 foot tall statue of a demon head sticking out of the ground. The landing to the entrance is the floor of the demon’s mouth. The entrance is about 10 feet wide by 7 feet tall and is essentially the demon’s mouth. The first room is a 10 x 10 space with steps immediately to the left. The stone door that falls into the floor is open.. it should be closed. A spiral staircase descends into the darkness.
Area 2:
30 feet below the surface is the first room of the crypt. It is pitch black. There are square pillars that line the walls, that appear to be part of the wall.
This is a great room to set up with traps or a puzzle of some sort. I contemplated setting a series of intricate floor tile traps as part of a security system for the crypt here, but my players were super low level and it didn’t work well for the story I was telling at the time.
The initial pass through of the crypt beyond Area 2 is not intended to be a room by room reveal but a means to build suspense through storytelling. As the party ventures back to Area 9, the skeletons will be activated for the return trip as they grind their way out. Skeletons were just the right challenge for the level my players were at when this was initially written. Obviously, feel free to swap in something much more malevolent if you see fit!
Area 3:
Room full of sarcophagi. The party will encounter d4 skeletons in this room on their way back from Area 9.
Area 4:
Room full of sarcophagi. The party will encounter d4 skeletons in this room on their way back from Area 9.
Area 5:
Room full of sarcophagi. The party will encounter d4 skeletons in this room on their way back from Area 9.
Area 6:
Room full of sarcophagi. The party will encounter d4 skeletons in this room on their way back from Area 9.
Area 7:
Room full of sarcophagi. A faint green glow can be seen coming from the hallway to the North.The party will encounter d4 skeletons in this room on their way back from Area 9.
Area 8:
Hallway containing sarcophagi. The hallway is visible as low light. The hall winds around into a larger more open room. The green glow coming from the North appears to be coming from the next room and gets drastically brighter just before the players enter Area 9. The hallway is visible as low light. The hall winds around into a larger more open room. The party will encounter d6 skeletons in this room on their way back from Area 9.
Area 9:
Room containing 4 elaborate tombs. The Room is pitch black, the source of the green glow has completely disappeared. There are also some long shelves in the room as well and tools that appear to be available to prep dead bodies. The tombs appear to be that of previous great Rulers and Lords, a DC15 History check will make this seem obvious. A DC12 STR test will allow a single player to pry the tomb open. Otherwise, if they utilize the boards (shelves) to pry a lid off, they may do so working together. The tombs will contain 4 magical items (See TREASURE list below) with the corpses (+1) that are relevant to each of the players.
As they turn to leave, the Litch’s Apprentice (OR Menacing Necromancer, Evil Wizard, whatever fits your narrative best…) will appear in a green flash in the hallway leading to area 8. (I used an easy cultist, he was to be easily vanquished as the party braced for the gauntlet that was about to unfold before them) He will tell the party not to interfere with his Master’s plans. He will quickly cast some spell (DC10 Arcane check will reveal it to be a Necromatic raise dead spell). He will fight to the death.
TREASURE:
- Genji Wrist Wraps: allows for a second or third fist strike that deals half damage on hit.
- Dextrous Bangle: +1 to DEX while worn
- Infinite Scarf: While worn or folded, appears to be a simple red hand knit overtly long scarf. When the wear desires so, it can become infinitely long. It is also unable to be burned and can be incredibly stretchy. It can be cut, but a new fringed end grows out of the cut end. The small end cut off has no magic remaining in it. (If cut exactly in half, designate one side as 1 and the other as 2. Roll 1d2. The result is the side that is no longer magical)
- Magic Hat of Many Disguises (bowler hat): This apparently normal bowler hat allows its wearer to alter her appearance as with a disguise self spell. As part of the disguise, the hat can be changed to appear as a comb, ribbon, headband, cap, coif, hood, helmet, and so on.